For dinner last night was Spice-Rubbed Picnic Chicken. This recipe required the chicken to refrigerate 6 to 24 hours after being rubbed with the spice mixture. This ensure that chicken would be tender and flavorful throughout the entire piece. After the chicken set it was baked in the oven at a high temperature for about 25 to 30 minutes. After the chicken was finished cooking it needed to cool completely. I let it cool for about 10 to 15 minutes before we ate it. It turned out really well, the rub really made this recipe. I'm glad we have a lot of left overs!
In addition to the picnic chicken we also had American Potato Salad with Hard-cooked Eggs and Sweet pickles. This recipe was prepared ahead of time and called for red potatoes that were required to refrigerate in red wine vinegar and salt and pepper for 20 minutes after cooking and before adding the dressing. This definitely gave the potatoes more flavor. This recipe turned out great and is a repeater along with the chicken!
Tonight on the menu:
New England Clam Chowder
Cheddar Biscuits
This blog is to document my experience preparing the recipes in The Complete America's Test Kitchen TV Show Cookbook
Thursday, September 2, 2010
Pasta w/ Garlic and Oil
The other night we were short on time and were hungry for dinner, so I decided to make Pasta with Garlic and Oil. It was a very simple recipe that was prepared in about 20 minutes. Most of the 12 garlic cloves used in this recipe were cooked over low heat for about 10 minutes, to bring some of the potency out of the garlic. The recipe also called for a touch of red pepper and lemon juice that really brought out the flavor of the dish. We both really loved it topped with Parmesan Cheese. The only complaint my husband had was that there was no meat, so I grilled him a chicken breast to go along with it. Overall a great dish!
Sunday, August 29, 2010
Classic Tuna Salad and Classic Macaroni and Cheese
Today's dinner was only half a success. The Classic Tuna Salad was the success. It was creamy, yet crunchy and full of flavor. I would have to say it was probably the best Tuna Salad I have had.
The Mac & Cheese was the failure and certainly not because of the recipe. In fact, it looked absolutely amazing. The noodles were perfectly tender and not soggy with cheese. The topping was browned just right. I couldn't what to eat it. Then I took one bite...salty...really salty...really, really salty. The recipe said to salt the pasta water, but it didn't say to rinse the noodles. I thought that might have been the problem, because I recalled that 3 tablespoons did seem like a lot of salt to add to the water. But why would they have you salt the macaroni then rinse it off. I thought maybe it said 3 teaspoons. So I looked back at the recipe, sure enough it said 1 tablespoon. I remember now, I was looking at the 3 tablespoons of butter it called for. I am so mad about this. I had to dump the entire dish it was bad and there was a lot of it. This was the second day in a row that I messed up on the ingredients. I really need to pay more attention in the future. I think I learned my lesson this time. Word of advice...double check EVERYTHING!
Next on the menu:
Picnic Chicken
American Potato Salad w/ hard-cooked eggs & Sweet pickles
The Mac & Cheese was the failure and certainly not because of the recipe. In fact, it looked absolutely amazing. The noodles were perfectly tender and not soggy with cheese. The topping was browned just right. I couldn't what to eat it. Then I took one bite...salty...really salty...really, really salty. The recipe said to salt the pasta water, but it didn't say to rinse the noodles. I thought that might have been the problem, because I recalled that 3 tablespoons did seem like a lot of salt to add to the water. But why would they have you salt the macaroni then rinse it off. I thought maybe it said 3 teaspoons. So I looked back at the recipe, sure enough it said 1 tablespoon. I remember now, I was looking at the 3 tablespoons of butter it called for. I am so mad about this. I had to dump the entire dish it was bad and there was a lot of it. This was the second day in a row that I messed up on the ingredients. I really need to pay more attention in the future. I think I learned my lesson this time. Word of advice...double check EVERYTHING!
Next on the menu:
Picnic Chicken
Big and Chewy Oatmeal-Raisin Cookies
As requested by my husband, I made Oatmeal-Raisin Cookies. This was a very easy recipe, especially since I already had all of the ingredients. This cookies required 2 sticks of butter (these are not low-fat cookies!). The recipe did require the use of a standing mixer fitted with the paddle attachment. My mixer just has the regular beater attachments, it worked fine but I had to scrap the beaters often. Everything went fairly well until I realized that I had forgotten to add in the brown sugar. I added regular sugar, but completely spaced the brown sugar. I realized this mistake after I had already added the oats and raisins. I tried using the mixer again to blend in the brown sugar, but it was just too thick. So I used my hands and basically kneaded it in. These cookies are meant to be very large. On my first batch (I had to make my batches separately, since I only have 1 cookie sheet) I made the balls too small and they are slightly more crunchy than my second batch which turned out perfect. My husband loves them. They have a nice buttery, oat flavor and are very chewy. Will definitely make again.
Charcoal-Grilled Bone-In Chicken Breast w/ Soy-Ginger Glaze and Grilled Potatoes with Garlic & Rosemary
For dinner last night my husband and I made Charcoal-grilled Bone-in Chicken Breast with a soy-ginger glaze. While America's Test Kitchen's method to grill chicken involved a three-step process, it did produce a very juicy and tender chicken with a crisp, brown skin. The soy-ginger glaze had a nice flavor to it, although my husband didn't care much for the Asian flavor. If I were to prepare the soy-ginger glaze again I would reduce the amount by at least half. There was a lot leftover that just went to waste.
In addition to the chicken breast, we also charcoal-grilled Potatoes with Garlic and Rosemary. I chose this recipe to go with the chicken breast because they both required both the direct and in-direct method of grilling. Basically I timed it by placing one on the direct side and the other on the indirect side, then switched when the time was right. The recipe was fairly simple but it did involve several steps of oiling the potatoes. This was where I think some of my problems with the final flavor came about. For one, the recipe required the use of wooden skewers. I had forgot to get them at the store, so I had my husband pick up some while he was out. He came home with metal skewers. Problem. The recipe requires the potatoes to be microwaved on the skewers prior to grilling. Since I was unable to do that, I just microwaved them in a bowl instead. All was OK, until I realized that I was suppose to oil and salt them first. They were almost completely done in the microwave when I realized this, so I oiled and salted them at that time. Once they were done in the microwave, I then placed them on the skewers (hot potatoes, ouch!) and completed the remaining oiling and grilling steps.
The potatoes themselves were cooked to perfection but the flavor of the potatoes where not as strong as I would have liked them to be. That was my fault for not oiling and salting prior to the microwave step.
On The Menu:
Classic Tuna Salad
Classic Macaroni & Cheese
In addition to the chicken breast, we also charcoal-grilled Potatoes with Garlic and Rosemary. I chose this recipe to go with the chicken breast because they both required both the direct and in-direct method of grilling. Basically I timed it by placing one on the direct side and the other on the indirect side, then switched when the time was right. The recipe was fairly simple but it did involve several steps of oiling the potatoes. This was where I think some of my problems with the final flavor came about. For one, the recipe required the use of wooden skewers. I had forgot to get them at the store, so I had my husband pick up some while he was out. He came home with metal skewers. Problem. The recipe requires the potatoes to be microwaved on the skewers prior to grilling. Since I was unable to do that, I just microwaved them in a bowl instead. All was OK, until I realized that I was suppose to oil and salt them first. They were almost completely done in the microwave when I realized this, so I oiled and salted them at that time. Once they were done in the microwave, I then placed them on the skewers (hot potatoes, ouch!) and completed the remaining oiling and grilling steps.
The potatoes themselves were cooked to perfection but the flavor of the potatoes where not as strong as I would have liked them to be. That was my fault for not oiling and salting prior to the microwave step.
On The Menu:
Classic Tuna Salad
Friday, August 27, 2010
Poached Salmon with Herb and Caper Vinaigrette & Green Bean w/ Toasted Hazelnuts and Brown Butter
Poached Salmon with Herb and Caper Vinaigrette was a success. It was a quick and simple meal to prepare in under 30 minutes. The salmon was very juicy with a pleasant lemony, herb flavor. The only problem I ran into was removing the skin from the salmon. I followed the notes in the cookbook on how to do it, I guess it takes a little practice and probably a sharper knife.
In addition to the Poached Salmon, I also prepared Green Beans with Toasted Hazelnuts and Brown Butter. I really liked these. My husband described them as tasting like popcorn. I would have to somewhat agree. I really did like them a lot, though. My husband just thought that they were just "OK". He enjoyed the salmon more.
Both dishes were very quick and simple to prepare and I would definitely make them again.
Next on the menu:
Charcoal grilled bone-in Chicken breast with soy-ginger sauce
Grilled potatoes w/ garlic & rosemary
and because my husband says he needs more desserts after dinner:
Big and Chewy Oatmeal-Raisin Cookies
Wednesday, August 25, 2010
Pan-Seared Inexpensive Steaks with Tomato-Caper Pan Sauce and Broiled Asparagus
Tonight's dinner turned out very well. My husband and I enjoyed pan-seared steak (I used a boneless top sirloin) topped with tomato-caper pan sauce and broiled asparagus. The steaks were cooked to medium-rare and were very tender and juicy on the inside, while the outside were perfectly seared. I topped the sliced steak with a tomato-caper pan sauce that I prepared while the steaks were resting. The broiled asparagus was tossed in olive oil, salt, and pepper and was broiled for 10 minutes, also while the steak was resting. In all, this entire meal took about 20 to 25 minutes to prepare. Both the steak and the asparagus turned out well. The only problem was that the asparagus were not very thick or in the best condition to begin with, causing them to wilt slightly. Despite that, though, they did have good flavor. This will definitely be a repeat meal!
Next on the menu:
Next on the menu:
Poached Salmon with herb and caper Vinaigrette
Green beans with toasted hazelnuts and brown butter
Tuesday, August 24, 2010
Skillet Lasagna and Leafy Green Salad with Red Wine Vinaigrette
Last night I made Skillet Lasagna for dinner. My family loves lasagna so I thought that this would be a good and quick way to make it. Essentially everything is prepared in the skillet. There is no baking at all. The recipe calls for a meatloaf mix for the meat, which is a combination of ground beef, pork, and veal. I just used 1-lb of ground beef since that is what I normally use in my lasagna. Once the beef is browned, the noodles are broken into 2-inch pieces and placed on top of the ground beef, then the tomato sauce mixture placed on top of the that and the mixture is simmered for about 20 minutes. Parmesan cheese is stirred in and tablespoon size dots of ricotta cheese are placed over the mixture. The final step involved sprinkling with basil and Parmesan.
While the meal was very quick and easy to prepare I felt that it lacked in flavor. I personally added more basil, some oregano, a little more salt, and some mozzarella cheese to mine. That helped a bit, but it still seemed to be lacking something. My husband described it as tasting like Hamburger Helper. Yuk! Despite the simplicity of the recipe I will not be making it again. I would rather take the time to prepare my regular lasagna.
In addition to the Skillet Lasagna, I also made Leafy Green Salad with Red Wine Vinaigrette. Like the lasagna, it was very easy to throw together, taking maybe 3 minutes. However, the red wine vinaigrette was a flavor that none of us preferred. Luckily the dressing wasn't so overpowering that we couldn't add another dressing to mask it, and that's what each of us did to save the salad.
Not every recipe is bound to be a success, but you won't know until you try it. The Skillet Lasagna was not uneatable, it just lacked the flavor of my normal lasagna.
Next on the menu:
Pan-Seared Inexpensive Steaks w/ Tomato Caper Pan Sauce
Broiled Asparagus
Monday, August 23, 2010
Easy Apple Strudel w/ Tangy Whipped Cream
Easy Apple Strudel was very easy and quick to make with America's Test Kitchen recipe. It basically replaced the homemade dough for store bought. They suggested 10 (14 by 9-inch) sheets phyllo, thawed. Well, I looked and I looked for these in the freezer section at both Meijer and Kroger and online. I did find Athens phyllo shells and phyllo dough, but not the sheets at Meijer. So I looked online at the Athens Pastries website and did find what I was looking for: Athens Pastries twin pack fillo dough 9" x 14". So I went to Kroger and I looked around in the freezer section and finally found the frozen dough. However, I was in a hurry and carrying my 10 month old baby, saw pastries sheets and grabbed two boxes of them. When I got home I realized I had bought Pepperidge Farm Puff Pastry Sheets. I didn't have time to take them back, so I used them instead. The recipe states that the apple filling will make 1 large apple strudel. Since I got the wrong sheets, I had to make four smaller strudels. Aside from the phyllo sheet mix-up, the only other change I made was the Calvados or apple cider. The recipe called for simmering the raisins and the Calvados at medium heat and the let stand and drain. Well I didn't have either Calvados or apple cider on hand and I wasn't going to buy a bottle of French apple brandy just for 2 tablespoons so the raisins can soak. Instead I just soaked the raisins in water until I needed them.
Overall, the recipe was good. My son really liked it, my husband not so much. I was indifferent. But I probably won't make this recipe again. I did make the Tangy Whipped Cream recipe that went along with the Easy Apple Strudel. The whipped cream was real easy to make and had a nice flavor. I will probably make that again for another recipe.
It's Chinese Night! On The Menu: PORK LO MEIN
Pork Lo Mein a classic Chinese take-out meal turned homemade. I must say that I think that I prefer the homemade version. First of all I didn't get sick, which is what usually happens when eat out anywhere other than pizza or Subway. Second, the pork was very tender and plentiful. Third, it wasn't overly greasy or salty (you got to expect a little with Chinese food). Finally, it was pretty quick and easy to prepare.
I do want to note that there are a lot of ingredients for this recipe. Many of which I had to hunt down in the Asian aisle at Meijer. The cost of these ingredients did add up, but most of them I barely used and I have a feeling that I will be using them for future recipes. Also there are a lot of steps to this recipe, but each step goes very quickly so read the recipe in advance.
The recipe suggested to sear one pound boneless country-style pork ribs in a cast-iron skillet, which was what I did and they did sear nicely. The recipe also called for shiitake mushrooms. Meijer did not have any available so I just used sliced baby bella mushrooms. As for the noodles, the recipe stated that your can either use fresh Chinese noodles or dried linguine. I went with the dried linguine, and it work very well.
Overall, everyone like this recipe and would like to have it again. However, everyone did say that it was very filling. In fact, so filling that no one was able to finish their plate!
On the menu for tonight:
Skillet Lasagna
Leafy Green Salad with Red Wine Vinaigrette
Sunday, August 22, 2010
Perfect Potstickers with Scallion Dipping Sauce: Our Appetizer for Chinese Night
Normally I would include my comments for this recipe with the main dish for the night, but I have quite a bit to say about these guys that I decided to create a post just for them.
Perfect Potstickers?
You might ask, what are potstickers? I was wondering myself what they were when I opened America's Test Kitchen Cookbook to the Let's Do Takeout chapter and saw the first recipe listed entitled Perfect Potstickers. There is a picture of them above the recipe, but that didn't really tell me what they were because I had not recognized them from any of the Chinese restaruants I have eaten at. The book stated, "To achieve the "perfect potsticker" there goal was to create soft, savory pillows filled with tender ground meat and crunchy cabbage and spiked with a pleasing hit of garlic, ginger, and soy. And they didn't want to make the wrappers from scratch." Hmmm.
So this recipe can be made in advance, which from my experience is probably what you want to do especially if you plan on having other items with them. The filling is very easy to make, basically like making meatloaf except with ground pork, cabbage, and scallions. The time consuming part (the part I became frustrated with) is the working with the wrappers. The recipe suggested to purchase 24 round gyoza wrappers...what's that??? Ok, so there is a side note that you can subsitute wonton wrappers instead. Oh great! I know actually what those are and where to find them at the grocery store (fyi: I'm being extremely sarcastic). After many trips up and down the Asian food isle and frozen food isle at Meijer, I finally located them in the produce section (go figure) by the mushrooms. What I found were wonton wrappers and they were square.
The filling process seemed simple enough on paper and even simpler with a step-by-step picture process on the next page, but I struggled on the first few. The book stated that they prefer round wrappers, I had square. They said if using square wrappers, fold diagonally into a triangle. Ok I did that. The book states, fill 1 tablespoon of filling into 1 wonton wrapper. Problem. One tablespoon is way to much for my square wrappers. Filling is pushing out everywhere and I had a major problem trying to get the wrappers sealed. I finally determined that 1/2 tablespoon worked well on the square wrappers then folding them over into a triangle and sealing the filling in. To seal the filling I first got a bowl of water for my fingers and dampened the wrapper before placing the filling on them. Once the filling was on, and the wrapper was slightly damp the sealing process went fairly easy by just pressing and pinching the air pockets out of the dumpling.
After about 15 minutes of doing this, I realized that I had hardly made a dent on the filling. This was going to take forever. So, I thought maybe I would try using 2 wrappers with 1 tablespoon of filling. This worked, but end result was too big of a serving. Also, I had left over filling. I used that to make meatballs. Once the potstickers were made, they were very easy to cook, you just have to make a small batch at a time. That was fine, because fortunately the potstickers freeze very well. So you don't have to cook them all in one day.
The scallion dipping sauce can also be made up to 24 hours in advance, but not really necessary it only took about 5 minutes to put together. It had a very good, spicy flavor to it.
Now for my review on the potstickers. Despite their ugly appearance, they are quite good. My son gobble up several of them right away. He wasn't a big fan of the sauce because it was a little too hot for his liking. My husband was leery about trying them because he said that he had had them before and didn't like them. But after begging him to just try one he said that he liked them and the dipping sauce very well and then proceeded to eat more.
I don't know if I will make these again after I use up my freezer store, because they did take a long time to make. Perhaps if I come across some better wrappers I may give it a try, but if you want to take the time to make them, go for it, they tasted great!
Fudgy Low-Fat Brownies
The Fudgy Low-fat Brownies had mixed reviews. While they were easy to make (especially while using the foil sling in the backing pan) and had a moist and fudgy texture, their flavor was very strong. Most, if not all of the tasters, were people who are accustom to the sweetness of store bought brownie mixes. This recipe, on the other hand, were very rich in flavor which several people did not like. Initially I cut the brownies into large squares, but came to realize that smaller bite-size pieces were the way to go since their richness went a long way. I probably will not be making this recipe again, because both my husband and son were not a fan of them. I guess not every recipe is bound to be a hit. There are 3 more brownie recipes in the cookbook that I will try eventually. Hopefully, one of them will be a better success.
Wednesday, August 18, 2010
Slow-Roasted Beef with Horseradish Cream Sauce & Smashed Potatoes
Today for dinner I made Slow-Roasted Beef with Horseradish Cream Sauce and Smashed Potatoes. On my last post I stated that I was going to be making King Arthur Soft Dinner Rolls with this meal, but time permitted me to make them today. Do not fret, I will be making them sometime soon.
As for the Slow-Roasted Beef, it turned out very well. I nice Medium-Rare bottom round roast. Most of the time when preparing a bottom round roast, it turns out very dry and tough. By roasting the beef at a very low temperature it turned out just the opposite, tender and juicy. This recipe was very simple involving just a couple main steps: Brining the meat, searing, and slow roasting. With the beef I prepared Horseradish Cream Sauce, which complimented the meat well. My husband even ate the sauce, and he is not a horseradish fan!
The Smashed Potatoes were a big hit. I had never had potatoes this way before. They had a rich and creamy flavor, with a chunky texture. The red potatoes that were used in this recipe were literally smashed with a wooden spoon and folded into butter-cream cheese mixture.
I would have preferred to include the King Arthur rolls with this meal, but the Slow-Roasted Beef and Smashed Potatoes were satisfying enough by themselves. Besides, we had room for some left-over Peach Pie for dessert!!
I won't be making any meals until Sunday, but I will be making brownies on Friday. So a preview for what's to come:
On the menu for Friday:
Fudgy Low-fat Brownies
On the menu for Sunday (we're doing Chinese)
Potsticker w/ Scallion dipping sauce
Pork Lo Mein
And for dessert:
Easy Apple Strudel
Tuesday, August 17, 2010
Peach Pie
One word. Yum!
I can't believe how well this pie turned out. It wasn't soupy or overly sweet, the bottom crust wasn't soggy or undercooked. The pie also set and cut very well. The piece cut and the remaining pie held its form. It was by far one of the best peach pie's both I and my husband has had. He loves pie and raved about how good the crust was, and how the peaches maintained their natural flavor.
So how did I make it? This pie was time consuming, I'm not going to lie. However, it was not overly difficult. I am usually intimidated making pies because of soupy insides, soggy crust, and pieces that fall apart when you cut them. For this pie I used the Basic Double-Crust Pie Dough recipe, which called for 2 parts flour to 1 part fat. The fat was key in this crust. It called for a stick and a half of butter and a 1/2 cup vegetable shortening. Now I most would use Crisco for the shortening. I don't like Crisco. I think it is unnatural and unhealthy. Instead I used Spectrum Organic Vegetable Shortening and it seemed to work just fine. The recipe also recommended that I use a lattice-top structure to allow for maximum evaporation while the pie cooks so that some of the peach juices cook down making the filling not as soupy. The other technique that helped with the juices was to let the sliced peaches sit in the sugar for a while and then drain most of the liquid. Like I said before this was a time consuming pie due to a lot of waiting for crusts to chill and peaches to get juicy. But overall this pie was fairly simple to prepare. The only complaint I have is my poor crimping skills. I suppose that will get better with time.
On the menu for tomorrow is:
Slow-Roasted Beef with Horseradish Cream Sauce
Smashed Potatoes
I'm also going to make a box of King Arthur Flour Soft Dinner Rolls
Monday, August 16, 2010
Crunchy Baked Pork Chops & Blanched Green Beans
Today for dinner I made Crunchy Baked Pork Chops and Blanched Green Beans. The pork chops came out exactly as their name describes them, crunchy. But they were not only crunchy on the outside, but tender and juicy on the inside. Their flavor was strong, almost Italian-like with the tangy, garlicky Parmesan flavor. And most importantly the breading did not fall off the meat!
I used natural boneless loin chops about 1 inch thick. The chops required brining before being breaded. The bread crumbs were also made from scratch. The recipe called for white sandwich bread, but I used whole wheat instead. I change nothing else in the recipe
I was planning on preparing Roast Green Beans today with the pork chops, but as I was looking over the recipes this morning I noticed that both the green beans and the pork chops would require the oven at the same time and I did not want uneven baking to occur, so I decided to make Blanched Green Beans instead. This was a very simple recipe which basically consisted of trimming the beans and boiling them for 6 minutes. Since I wasn't prepared to make one of the special butter sauce recipes from the cookbook, I simply tossed the drained beans in butter, sea salt, and pepper. The green beans turned out well, for being such a simple recipe.
On the menu for tomorrow:
Peach Pie using the Basic Double Crust pie dough (I'm nervous about this one)
Sunday, August 15, 2010
Simple Pot Roast & Scottish Toasting Bread
Simple Pot Roast right out of the oven |
Reducing sauce in Dutch oven after roast and veggies came out |
Scottish Toasting Bread |
On the menu for tomorrow is:
Crunchy Baked Pork Chops
Roasted Green beans
Saturday, August 14, 2010
My New Lodge Dutch Oven
I survived my trip to Walmart to purchase my new blue Lodge Dutch Oven, but not without an issue. Before I had went to Walmart I priced the Dutch oven on Walmart's website. They stated that it was $49.99. So when I found the item on the shelf, the price listed below it stated $65.99. I took the oven up to the register and sure enough when the cashier scanned it in, it came up as $65.99. I told him that they had it listed online for $49.99. And just as I told the cashier that I noticed on the box another sticker stating the price was $49.97. I showed the cashier that and he corrected it, but that still validates my lack of trust and respect for Walmart and will still try and avoid it as much as possible. Aside from that my new Dutch oven is actually very nice and I am very excited to use it tomorrow.
Dutch Oven Problem
While reading over the Simple Pot Roast recipe for tomorrows meal I noticed that it requires a Dutch oven. I don't have a Dutch oven. So I guess I am going to have to get one very soon. The equipment recommendations in the back of the cookbook suggest several options. Le Creuset 7 1/4 quart Round French oven for $269...uh no. All-Clad Stainless 8-quart Stockpot for $279...definitely no. Tramontina 6.5-qt cast iron Dutch Oven $40...we have a winner!!! I also check America's Test Kitchen's website to see if there are any more recommendations and along with another expensive one that I'm not going to consider, they have Lodge enamel-on-cast-iron 6-quart Dutch oven for $49.99. I click on both the Tramontina and the Lodge link buttons and both state that they are available at Walmart. Problem...I hate Walmart and refuse to shop there. I check Meijer's website, neither option is there. I check Target and they do have the Lodge Dutch Oven but its $99.99...ridiculous. I finally check Sears, my last option, and they don't have either one. Looks like I'm going to have to make the trek to Walmart. I would prefer to get the Tramontina 6.5-qt vs. the Lodge 6-qt, but the Tramontina is only available online so since I'm pressed for time I'm going to have to get the Lodge. All I have to say is, this better be a good Dutch oven if I'm going to Walmart to get it. Wish me luck:\
Friday, August 13, 2010
Charcoal-Grilled Hamburgers & Wilted Spinach Salad w/ Warm Bacon Dressing
I have successfully completed my first meal out of my new cookbook and I have to say that overall it was a success. I chose this meal to start for several reasons: a) I already had hamburger, b) it was a fairly quick meal to prepare, and c) it wasn't all the complicated.
The Charcoal-Grilled Hamburgers were the biggest success. Everyone loved them although my husband did state that his was a little pink. That's ok because I really was shooting for a medium-rare to medium. My burger along with my son's was more on the medium side whereas Anthony's was more medium-rare. All having to do with placement on the grill. He didn't mind and ate the entire burger anyways. When preparing the burgers I did make some changes.
- I used pre-made patties that I got from the butcher. However I did have to reshape them because that got smashed in the freezer.
- I did not salt and pepper the meat.
- I only made 3 burgers instead of 4.
- I do not have a large chimney starter for my grill so I just built a single-level layer using the direct cooking method.
- I did grease the grate, but with grill cooking spray.
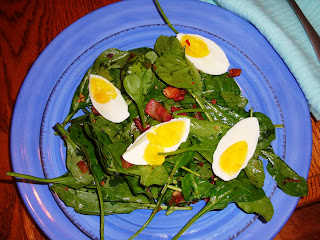
I thought the Wilted Spinach Salad with Warm Bacon Dressing was delicious. It had a really nice, balanced flavor. The large chucks of bacon really made this salad, and it complimented the burgers well. My husband liked it but didn't think that dressing was strong enough (he is a balsamic kind of guy). My son did not like it at all (he usually only eats salads with ranch on them). I personally would make this salad again however I do have one complaint. The recipe called for 3 hard-cooked eggs and I used their "Foolproof Hard-Cooked Egg" recipe. I have heard of this method before but it has just never worked for me. The eggs are always under cooked and they peel very poorly. The "foolproof" method involves covering the eggs with 1 inch of water, bring to a boil, cover and remove from heat and let them set for 10 minutes. Cool in ice water then peel. I always have to hard boil my eggs for a least 5 minutes to get good results. Oh well, I guess I'll just go back to my old way.
So other than the eggs both recipes were good...at least for me:)
I will not be making a meal tomorrow, but on the menu for Sunday August 15, 2010 is:
Simple Pot Roast
The Complete America's Test Kitchen Cookbook
A few week's ago I was flipping through the channels on my TV and came across America's Test Kitchen on the Create Channel. I immediately fell in love with it to the point of addiction. I love how they really try out each recipe in many different ways to get the perfect result. They describe the methods and science behind each recipe, and inform you of the best equipment and products available without bias. Most of the cookbooks that I have I'm only interested in a just a few recipes in it, but with America's Test Kitchen they take all of the popular everyday meals and make them fantastic. I printed off a few recipes to give it a try and immediately fell more in love with America's Test Kitchen when I made Maple-glazed Pork Tenderloin. It was fabulous. My 11 year old son practically devoured the entire thing on its own.
After the pork tenderloin I knew that I had to buy the cookbook. The TV show has been on for ten years, and I wanted every recipe I could get, so I bought the complete volume with every recipe, equipment and product guide in it. There are about 680 recipes in this book. My goal is to try every one. I will try and make 3 to 4 meals a week, including at least one dessert a week and possibly one breakfast or brunch a week. After I complete each recipe I will post the results online.
So...On the menu tonight:
Charcoal-grilled Hamburgers
Wilted Spinach Salad
Subscribe to:
Posts (Atom)